| “This site contains affiliate links for which OEMDTC may be compensated” |
Technical Bulletin
| Division: | Automotive | Section Title: | HVAC |
| Category: | Technical | TSB No. | TS 01 11198 |
| SUBJECT: | CUSTOMER SERVICE CAMPAIGN “NJ” A/C LEAK CHECK AT SUCTION HOSE |
| MODEL(S): | FORENZA, FORENZA WAGON, RENO (RQ420) 2008 |
| YEAR: | |
| AFFECTED VINS: | SEE ATTACHED VIN LIST |
| NOTE: There may be VINs between the affected VIN numbers that are not included in this campaign. If the vehicle is in dealer inventory or the customer brings the vehicle in for any kind of service, please check vehicle history on Suzuki Connect to verify wether the VIN is affected or not. | |
| CONDITION: | A/C may not be getting as cold as usual or may not cool at all. |
| CAUSE: | The A/C suction hose was incorrectly manufactured between March 1st and May 31st of 2008. The bead thickness at the connection between the suction hose and compressor was incorrectly manufactured. |
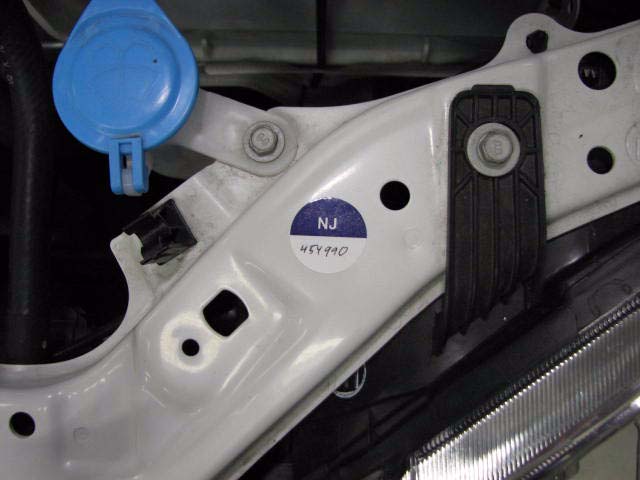
| CORRECTION: | Dealers are to leak check and if necessary replace the suction hose assembly on all affected in-stock and customer vehicles regardless of vehicle age, mileage, or date of visit. Please check under the engine hood at the core support for the “Purple” “NJ” sticker or the vehicle warranty history to verify if the repair is already done. Please follow below instructions to inspect and replace the suction hose on affected vehicle. |
Please refer to the Campaign Bulletin SC-46 for claim submission instructions and labor times.
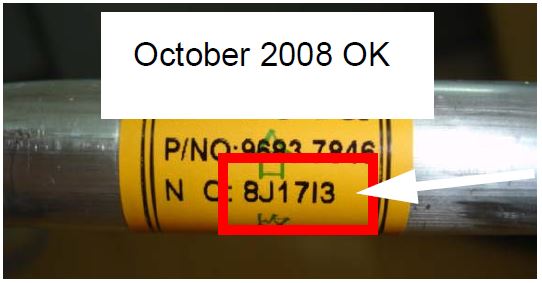
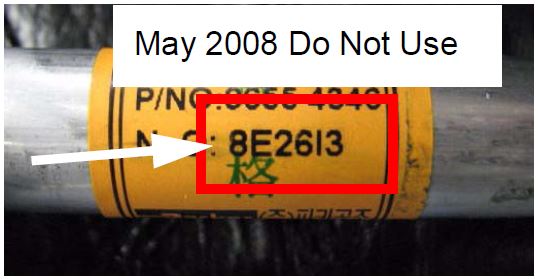
Potentially affected part LOT #s are 8CXXXX, 8DXXXX, 8EXXXX (produced in C=March, D=April, E=May, 2008). Only install replacement suction hoses manufactured before or after the above LOT codes. Affected lot number parts may be returned for credit. See inspection instructions below.
PART(S) INFORMATION:
| Part Numbers | Description | QTY | Notes |
|---|---|---|---|
| 95710-85Z10 | Suction Hose Assembly | 1 | Suction Hose is supplied with new washer. |
| 95856-86Z00 | Washer | 1 | To be used on discharge side at compressor. |
| ACD-ZX1-SPX | *A/C Electronic Leak Detector Kit | 1 | Available on Pitstop if an equivalent is not currently available in your service shop. |
| ACD-16380-SPX | A/C UV Leak Detector Kit | 1 | Available on Suzuki Pitstop if an equivalent is not available in your service shop. |
* Preferred Tool
Inspection Procedure with Electronic Leak Detector:
- Open the hood and look for campaign sticker. Go to next step if not found.

- Check vehicle master for campaign completion. If not done, continue to next step.
- Start the engine, turn the A/C ON. Run the engine to 1500 r.p.m. for 2 minutes. If the A/C cools, continue to step 4. If the A/C does not cool within the first 2 minutes, recover, evac, and recharge the A/C refrigerant and continue to step 4.
- Turn OFF the engine.
- Check for refrigerant leak at the compressor manifold block with the electronic leak detector. Follow the instruction provided with the leak detector for proper operation and accurate testing. If a leak is present, continue to step 6. If a leak is not detected, inspection is complete. Apply the sticker to the core support. (see step 1)
NOTE: If the refrigerant was low or completely gone and a leak is not found at the indicated location, this TSB does not apply. Please diagnose leak as usual within normal procedures.

- Replace the suction hose according the service manual instructions “A/C Suction Hose Assembly Removal and Installation”.
NOTE: Use part # 95710-85Z10, verify the lot number before installation See page1. Return all dealer stock under part # 95710-85Z00 to your primary PDC with a Discrepancy Report.
- Apply the campaign sticker to the core support.
Inspection Procedure with A/C Fluorescent Dye Leak Detector:
- Open the hood and look for campaign sticker. Go to next step if not found.
- Check vehicle master for campaign completion. If not done, continue to next step.
- Start the engine, turn the A/C ON. Run the engine to 1500 r.p.m. for 2 minutes. If the/ C cools, continue to step 4. If the A/C does not cool within the first 2 minutes, recover, evac, and recharge the A/C refrigerant and continue to step 4.
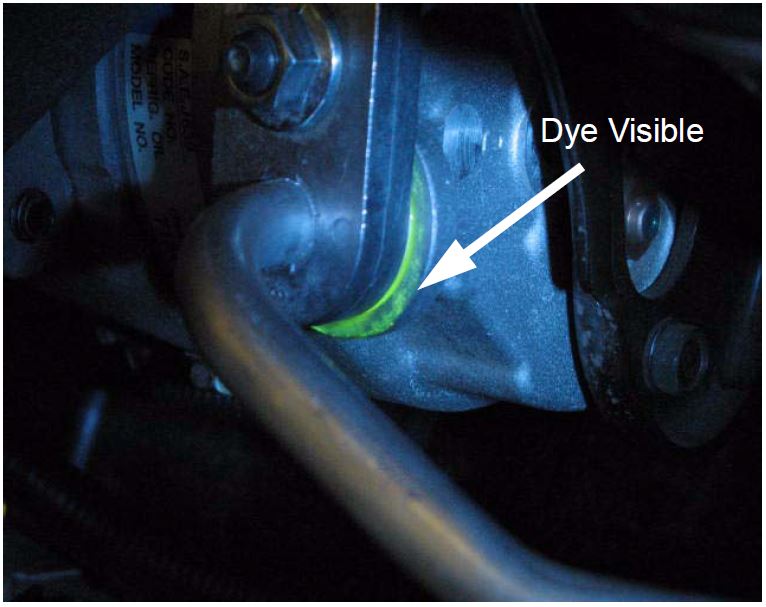
- With engine running and A/C ON, inject refrigerant dye into the suction line test fitting using refrigerant dye injector. (Follow the instructions supplied with the kit) Allow the A/C to run for 5 minutes with fan on the highest speed and the recirculate button set for outside air.
- Turn OFF the engine.
- Check for refrigerant leak at the compressor manifold block with the UV light and UV filter goggles. (The UV light will illuminate with a yellow/green color any dye which has escaped from the system) If a leak is present, continue to step 7. If a leak is not detected, inspection is complete. Apply the sticker to the core support. (see step 1)
NOTE: If the refrigerant was low or completely gone and a leak is not found at the indicated location, this TSB does not apply. Please diagnose leak as usual within normal procedures.
- Replace the suction hose according the service manual instructions “A/C Suction Hose Assembly Removal and Installation”.
NOTE: Use part # 95710-85Z10, verify the lot number before installation See page1. Return all dealer stock under part # 95710-85Z00 to your primary PDC with a Discrepancy Report.
- Apply the campaign sticker to the core support.
